Currently I'm experimenting with FlashSurf library, an alchemy port of popular Surf algorithm which is widely used in machine vision problems like object recognition, 3d reconstruction and augmented reality.
The author, Eugene, does a good job in combining multiple c/c++/java libraries (OpenCV, OpenSurf, libmv SURF, Dlib and JavaSurf) to make Surf algorithm work in AVM.
Check out Eugene Blog for the details.
He uses TDSI tool written by Joa for further optimization. I check FlashSurf lib with and without TDSI. It boost the speed a lot. I think anyone experimenting with Actionscript/Alchemy should use it.
Keep ActionScript'ing...
Thursday, November 12, 2009
Tuesday, November 10, 2009
Snow effect with actionscript 3
Recently, I need some snow effect with actionscript. I search the net for samples, and found one. http://www.tutorio.com/tutorial/flash-snow It was written on ActionScript 2 but the idea was simple.
Just create a movie clip with linkage class name Snow in Flash Proffesional. Put any graphics you want in it (just a small white circle will be fine). Create anothor movie clip on the stage with linkage class name Snowing. Just play with the randomization parameters for different effects.
Happy snowing...
- Create several copies of snow Sprite
- Let the y-velocity of these snow sprites random
- Let the x-positions of these sprites swing by using sine (or cosine) function.
Just create a movie clip with linkage class name Snow in Flash Proffesional. Put any graphics you want in it (just a small white circle will be fine). Create anothor movie clip on the stage with linkage class name Snowing. Just play with the randomization parameters for different effects.
package
{
 import flash.display.Sprite;
 import flash.events.Event;

 public class Snow extends Sprite
 {
  private var yVelocity:Number;
  private var xRadius:Number;
  private var xIncrement:Number;
  private var xAngle:Number;
  private var xOrig:Number;
  public function Snow()
  {
   yVelocity = 2 + Math.random() * 5;
   xRadius = 10 + Math.random() * 100;
   xIncrement = 0.001 + Math.random() * 0.05;
   xOrig = Math.random() * 1000;
   xAngle = 2*Math.random()*Math.PI;
   x = xOrig;
   y = Math.random() * 600;
   alpha = 0.2+0.8*Math.random();
   scaleX = scaleY = 0.2+0.8*Math.random();
   addEventListener(Event.ENTER_FRAME, onEnterFrame);
  }
  private function onEnterFrame(e:Event)
  {
   this.y += yVelocity;
   this.x = xOrig + xRadius*Math.sin(xAngle);
   xAngle += xIncrement;
   if (this.y >= 600)
    this.y = 0;
  }
 }

}
package
{
 import flash.display.Sprite;

 public class Snowing extends Sprite
 {
  private var numSnow:int = 1000;
  public function Snowing()
  {
   for (var i = 0; i < numSnow; i++)
   {
    var snow:Snow = new Snow();
    addChild(snow);
   }
  }

 }

}
Happy snowing...
Wednesday, November 4, 2009
Flash Player 10 - Context Menu not working on Embedded Video
A simple problem: Place an embedded video on stage. Customize context menu using ContextMenu class (flash.ui.ContextMenu). ContextMenuEvent.MENU_ITEM_SELECT event won't fire when you right click on embedded video. Just click on anywhere without video, it will work. If you place a rectangle over the video with 0% alpha fill , it will start working even on the video. This happens with Gaia framework, but i think this is a flash player bug.
I didn't google if someone else having the same problem or not. Just an unimportant experience.
I didn't google if someone else having the same problem or not. Just an unimportant experience.
Tuesday, August 18, 2009
The Best .NET CMS Solution: Kentico CMS
I'm working at PrimeArt for 10 years as CTO. In the early days, we we using Perl & PHP as the programming language and MySQL as the database backend. We develop several core CMS software and customize them for various clients and projects.
When the number of the projects increases the maintenance becomes a big issue. Technology also changes, and you need to adapt them. At core, we are not a development company but a solution provider. We came to a situation that we need to choose a commercial CMS solution. We tested several CMS from different providers and found Kentico CMS as the solution to all of our problems. The version of Kentico CMS was 1.9 at that time.
The current version of Kentico CMS is 4.0 and it dramatically changed from the first version we used. Regarding the features of the current state I can list the reasons why to choose Kentico CMS:
- Excelent support
One most important thing in using a commercial application is support. During several years, Kentico support team help us to fulfill the project requirements. - Easy development
Most of our work includes repeated development. We do same things again and again in different projects. Kentico CMS includes a wide range of web parts which satisfies more than 90% of common development tasks. This cuts the development time and since Kentico CMS is a tested platform, the number of bugs to resolve decreased dramatically. - Fast learning curve
A developer who is familiar with CSS and HTML can start developing sites with just one week of training. The admin interface is very intutive and consistent although the documentation needs more refinement and examples. - Excelent portal engine
With Kentico CMS Portal Engine, most of the work can be done just using the browser. You do not need to open Visual Studio at all. This allows us even non-programmer web professionals can develop complicated database driven web sites (now also social network sites) without a single lines of code. Also you can add C# codes from the browser. This means that once Kentico CMS is installed on a server, you can even use your IPhone to develop your site (I try, it works :)) - Extensibility
The requirements can vary a lot from project to project. So you may encounter a situation that you need the change default behaviors supplied by Kentico CMS. Almost every part of it is easy to extend. You can intercept with most of the events (tree handlers, data handlers, workflow handlers, authentication handlers). You can write your own webparts and use them in different projects with the same requirements. - Easy to administer
Common administration tasks can be performed using the admin interface from the web browser. You can get backups, easily deploy the site to other server, change settings in a
few seconds, check the event log etc. - The list goes on and on...
I cannot complete the list here. Please check out their web sites for other features. Also I urge you to download Kentico CMS and check it yourself.
Sunday, August 16, 2009
Next generation of HTML: HTML 5.0
It was 1995 when Tim Barners-Lee published the first formal specifications for HTML (Hypertext Markup Language - 2.0). I was in the university at that time, and used internet to download guitar tabs using the terminals of the mainframe with a bandwidth around 100 bytes/sec :). Internet goes very dramatic change until today. Technology starts pushing the boundaries between the physical world and virtual world. However HTML stayed as the core building block. It is very normal for it to adapt the change in requirements. Today allmost all communication, gaming and assistance devices support HTML.
The current working draft version is HTML 5.0. You can view latest editor version here.
Today I had a free time and check the specs. The first thing that hits my eyes was audio and video tags. Until this time, media files are used without any standars. Some developers prefer flash to render video, others use quicktime and windows media player. You need to download the relevant plugins to view the video files. Also the developers should add different HTML tags, and possibly javascript codes, to view and control the videos. With the aid of standard video and audio tags, the user agent will be responsible to render the video. The developer will add standard HTML codes regardless of the media format used in videos. Also for indexing sites, like Google video, these standardization will yield considerably much less work to index the videos.
Another interesting tag is the canvas tag. With this tag, the developers will be able to dynamicaly generate images on the client side using JavaScript API. If it is supported by the wide range of used agents and devices, it can replace some proprietary tools and methods (like server side generation of images, or plugins like Adobe Flash). Canvas supports (not so) advanced graphics commands like transformation (for scaling and rotation) and shadows.
One common use of HTML is to display a list of records, like the phone numbers, the bank account history, the list of friends etc. HTML 5.0 introduces a new tag called datagrid to simplify and standardize these types of displays. Traditionally, such data are rendered using the tables. Datagrid allows typed data to be presented in an interactive form to the user. The data can be hierarchical (tree structure) or flat (simple table). It has standard api functions to manipulate and interact with the datagrid. However this section is commented out in the current working draft version. I'm not sure datagrid will be in the final version or not.
The specification is currently under development. However it is promising that people from Apple, Mozilla and Opera are working together for the specifications that they should obey :).
That's all for now.
Keep hypertexting...
Thursday, August 13, 2009
Using Different Ease Functions in ActionScript
In previous post I used a formulation for motion tweening based on the update rules in machine learning methods. In this method, you have a target value x0 (target position for tween). At each time step, you update the variable x by a percentage of the distance between the target and current. Like the following formation:
Suppose that the current positin of the movie clip is at x0, and the final (target) position is at x1. We need to find a function which takes x0, x1, t (current time), and tf (total time) as parameters and returns the expected position at time t.
 If we scale the percentage of time between -π/2 and π/2, the sine function returns us the percentage of the position at that time. However we need to scale also the return value from the sine function. The final formulation is like the following
Also check out TweenLite which is also used in Gaia Flash Framework. You will have lots of tweening types like these ones, and you will be able to use them with just a single line of code. It has also very small fingerprint.
Keep flashing...
x = x + α(x0 - x)This is also equivalent to
x = (1-α)x + αx0This can be used for easing out, not easing in. In this post I'll demonstrate a simple method for easing in&out simultaneously.
Suppose that the current positin of the movie clip is at x0, and the final (target) position is at x1. We need to find a function which takes x0, x1, t (current time), and tf (total time) as parameters and returns the expected position at time t.
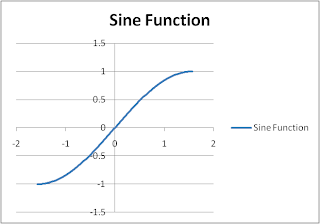
f(x0, x1, t, tf)We can use sine function for this purpose. The below figure is the sine function between -π/2 and π/2.
 If we scale the percentage of time between -π/2 and π/2, the sine function returns us the percentage of the position at that time. However we need to scale also the return value from the sine function. The final formulation is like the following
x = f(x0, x1, t, tf) = (x1-x0) sin((t/tf - 0.5)*π)+1)/2In ActionScript 2.0, you can use the following code where box_mc is the movieclip instance you want to move with ease.
You can download the source code. Checkout the following example. (Google Sites fixes the problem with flash files it should work now)
var t = 0;
var tf = 40;
var x0 = 0;
var x1 = 500;

onEnterFrame = function ()
{
if (t<tf)
{
box_mc._x = (x1-x0) * (Math.sin((t/tf - 0.5)*Math.PI)+1)/2;
t++;
}
}
Also check out TweenLite which is also used in Gaia Flash Framework. You will have lots of tweening types like these ones, and you will be able to use them with just a single line of code. It has also very small fingerprint.
Keep flashing...
Tuesday, August 4, 2009
Easy Ease with ActionScript 2.0
Motion tweening is at the core of Adobe Flash animations. Even you can create tweenings on the stage using the design tools, you can achieve same animations using the action script. This way you can control your animation with the parameters you defined in the code. Once you get used to animating with ActionScript, it will open you a new world of parametric animation.
Simplest code for ease out is as follows:
where
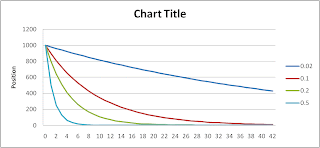
Following figure illustrates the effect of changing the ease factor. The x-axis is time and y-axis is the remaining distance from the destination point. Higher ease factor values, more time needed to reach the destination.
 To see the animation, checkout the following:
You may not see the following flash animation becase .swf file is hosted on google and an update on google sites breaks flash file playback, so check it later after they fixed the problem.
Download Source
Simplest code for ease out is as follows:
this.onEnterFrame = function() {
box_mc._x += (400-box_mc._x) * 0.2;
}
where
box_mc is the movieclip we are animating, 400 is the destination _x value and 0.2 is ease factor. Interpretation of this: the movieclip (box_mc) moves 20% of its remaning way at each frame iteration. Suppose that the moviclip is at x-position 0 at the first frame. At the second frame it will be at position 80. At the third frame it will be at position 80 + (400-80)*0.2 = 144. Just put 144 instead of 80 you will get next x position. 144 + (400-144)*0.2 = 195.2. This continues until x position of the movieclip is very close to 400 and the change is almost zero (but not zero).Following figure illustrates the effect of changing the ease factor. The x-axis is time and y-axis is the remaining distance from the destination point. Higher ease factor values, more time needed to reach the destination.
 To see the animation, checkout the following:
You may not see the following flash animation becase .swf file is hosted on google and an update on google sites breaks flash file playback, so check it later after they fixed the problem.
Download Source
Friday, July 17, 2009
Integrating Red5, Xuggler and Pure-Data - Part 2
In this post, I demonstrate how to use Red5, Xuggler and PD (Pure-Data) together for frequency analysis of the sound.
What we will try to do is
In order to develop application in Red5 you need to have an IDE (Integrated Development Environment). Even though you can use command line java compiler (javac) and your favorite text editor (notepad :)), I recommend you to use an IDE.
Eclipse is an open source java based IDE. You can download Eclipse from http://www.eclipse.org/downloads. Download and install Eclipse IDE for Java Developers.
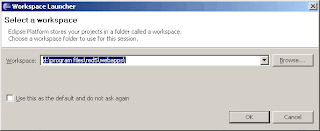
When you run Eclipse for the first time, it will ask you the workspace directory. Workspace is a directory in which all your projects resides (for example java). You can enter <RED5_HOME>\webapps\ as the workspace if you will use Eclipse only for this project. Replace <RED5_HOME> with the directory where you install Red5 (ex. c:\Program Files\Red5).
In the previous post, we install audiotranscoder application. Now we will get the code for this application, change and compile it again.
To continue please first install audiotranscoder demo application as described here.
Now you have
http://code.google.com/p/xuggle/source/browse/#svn/trunk/java/xuggle-xuggler-red5/src/com/xuggle/red5/demo
Download AudioTranscoderDemo.java and AudioTranscoderDemoAdapter.java.
Create a new directory called src under webapps\audiotranscoder. Also create com\eb\red5 directories under src directory. Copy the two java files under this directory. At the end you should have the following files:
First update the package declaration in both files from
to
Open WEB-INF\red5-web.xml file, find web.handler and change it as the following
This will tell red5 the name of the class which is responsible to handle the rtmp requests.
Create a folder called
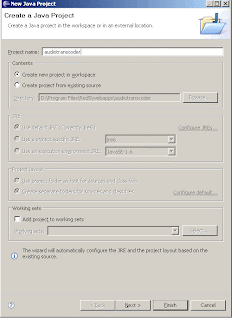
Now open eclipse. Select the workspace (c:\program files\red5\webapps). Click File/New/Java Project from main menu. Enter project name as "audiotranscoder". Click Next.
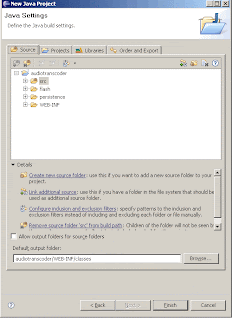
 In the next screen, right click on src folder and click on "Use as Source Folder". As default output folder enter audiotranscoder/WEB-INF/classes. If there is no classes folder create it manually.
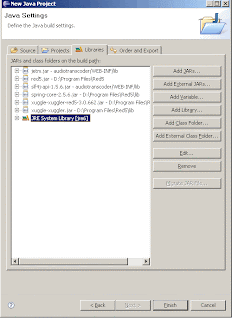
 Click on Libraries tab. Click on "Add Library". This will open another form. In this form select "JRE System Library", click next and finish. Click on "Add External JARs..." Select xuggle-xuggler.jar, xuggle-xuggler-red5-3.0.662.jar and spring-core-2.5.6.jar from C:\Program Files\Red5\lib folder. Click "Add External JARs..." again and now select red5.jar from C:\Program Files\Red5 folder. Click on "Add JARs..." and select audiotranscoder\WEB-INF\lib\jetm.jar and slf4j-api-1.5.6.jar. It looks like the following
Click finish to create the project on Eclipse.
Now run Red5 from command line (c:\program files\red5\red5.bat). Open your browser and navigate to the address http://localhost:5080/demos/publisher.html.
Select Publish tab, enter stream name as "test", select audio device and click Start.
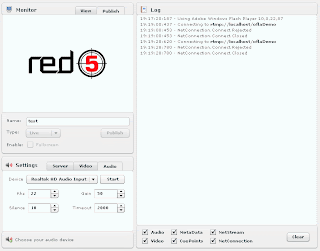 Select View tab. Enter "xuugle_test" as stream name, rtmp://localhost/audiotranscoder as server location and set Buffer to zero. Click on Connect.
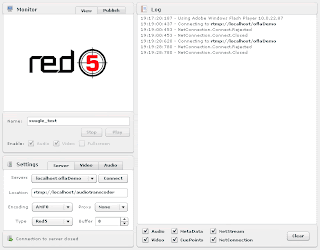 Now you are publishing a stream named "test", it is decoded and encoded again (using PCM which is the raw format) and published with the stream name "xuggle_test".
What we will do now is to get the sound data from PCM stream.
PCM stands for Pulse-Code Modulation. See Wikipedia article for more information.
Now click on File/New/Class from Eclipse main menu. Enter com.eb.red5 as package, AudioListener as the name of the class and com.xuggle.red5.AudioSamplesListener as superclass. Leave other options as is and click Finish.

Paste the following code into AudioListener.java file.
For this to work you should also modify AudioTranscoderDemo.java file and have the following partial code in it.
Before:
After:
With this code we create an instance of the class
Now Eclipse compiles your code automatically. You can restart Red5 server and check the results. Run Publisher demo again and connect to
In this post we learned how to setup eclipse to work with Red5-Xuggle application and get the raw sound data. In the next post we will use pure-data to get the pich of the sound.
Keep coding...
What we will try to do is
- Get audio signal from flash client (handled by flash & red5)
- Decode audio file and get raw audio data (handled by xuggle)
- Send the raw audio stream to pure-data (no quick solution)
- Get the pitch of the sound (handled by pure-data)
- Send the pitch of the sound back to red5 (no quick solution)
- Send the pitch of the sound back to client (handled by red5 & flash
In order to develop application in Red5 you need to have an IDE (Integrated Development Environment). Even though you can use command line java compiler (javac) and your favorite text editor (notepad :)), I recommend you to use an IDE.
Eclipse is an open source java based IDE. You can download Eclipse from http://www.eclipse.org/downloads. Download and install Eclipse IDE for Java Developers.
When you run Eclipse for the first time, it will ask you the workspace directory. Workspace is a directory in which all your projects resides (for example java). You can enter <RED5_HOME>\webapps\ as the workspace if you will use Eclipse only for this project. Replace <RED5_HOME> with the directory where you install Red5 (ex. c:\Program Files\Red5).

In the previous post, we install audiotranscoder application. Now we will get the code for this application, change and compile it again.
To continue please first install audiotranscoder demo application as described here.
Now you have
audiotranscoder folder under webapps directory in Red5 installation folder. In order to change audiotranscoder application we need to get source code of this demo application first. You can get the source code of audiotranscoder application from svn archieve. Since The source code is just two files you can download them directly from the following web page:http://code.google.com/p/xuggle/source/browse/#svn/trunk/java/xuggle-xuggler-red5/src/com/xuggle/red5/demo
Download AudioTranscoderDemo.java and AudioTranscoderDemoAdapter.java.
Create a new directory called src under webapps\audiotranscoder. Also create com\eb\red5 directories under src directory. Copy the two java files under this directory. At the end you should have the following files:
- c:\Program Files\Red5\webapps\audiotranscoder\src\com\eb\red5\AudioTranscoderDemo.java
- c:\Program Files\Red5\webapps\audiotranscoder\src\com\eb\red5\AudioTranscoderDemoAdapter.java
First update the package declaration in both files from
package com.xuggle.red5.demo;
to
package com.eb.red5;
Open WEB-INF\red5-web.xml file, find web.handler and change it as the following
<bean id="web.handler"
class="com.eb.red5.AudioTranscoderDemoAdapter"
init-method="init">
<!-- Have the profiler spit out data every 15 seconds -->
<property name="profilerFrequency" value="15"/>
</bean>
This will tell red5 the name of the class which is responsible to handle the rtmp requests.
Create a folder called
lib under WEB-INF directory. Copy <XUGGLE_HOME>\share\java\jars\slf4j-api.jar and <XUGGLE_HOME>\share\java\jars\commons-cli.jar files to lib folder. Also you can select copy these files under <RED5_HOME>\lib folder instead of <READ5_HOME>\webapps\audiotranscoder\WEB-INF\lib folder. Download and copy jetm.jar file under lib folder.Now open eclipse. Select the workspace (c:\program files\red5\webapps). Click File/New/Java Project from main menu. Enter project name as "audiotranscoder". Click Next.
 In the next screen, right click on src folder and click on "Use as Source Folder". As default output folder enter audiotranscoder/WEB-INF/classes. If there is no classes folder create it manually.
 Click on Libraries tab. Click on "Add Library". This will open another form. In this form select "JRE System Library", click next and finish. Click on "Add External JARs..." Select xuggle-xuggler.jar, xuggle-xuggler-red5-3.0.662.jar and spring-core-2.5.6.jar from C:\Program Files\Red5\lib folder. Click "Add External JARs..." again and now select red5.jar from C:\Program Files\Red5 folder. Click on "Add JARs..." and select audiotranscoder\WEB-INF\lib\jetm.jar and slf4j-api-1.5.6.jar. It looks like the following
Click finish to create the project on Eclipse.

Now run Red5 from command line (c:\program files\red5\red5.bat). Open your browser and navigate to the address http://localhost:5080/demos/publisher.html.
Select Publish tab, enter stream name as "test", select audio device and click Start.
 Select View tab. Enter "xuugle_test" as stream name, rtmp://localhost/audiotranscoder as server location and set Buffer to zero. Click on Connect.
 Now you are publishing a stream named "test", it is decoded and encoded again (using PCM which is the raw format) and published with the stream name "xuggle_test".
What we will do now is to get the sound data from PCM stream.
PCM stands for Pulse-Code Modulation. See Wikipedia article for more information.
Now click on File/New/Class from Eclipse main menu. Enter com.eb.red5 as package, AudioListener as the name of the class and com.xuggle.red5.AudioSamplesListener as superclass. Leave other options as is and click Finish.

Paste the following code into AudioListener.java file.
package com.eb.red5;

import com.xuggle.red5.AudioSamplesListener;
import com.xuggle.xuggler.IAudioSamples;
import com.xuggle.xuggler.IAudioSamples.Format;

public class AudioListener extends AudioSamplesListener {

@Override
public IAudioSamples postDecode(IAudioSamples object) {
// TODO Auto-generated method stub
long N = object.getNumSamples();
for (long i=0;i<N;i++)
{
long sample = object.getSample(i, 0, Format.FMT_S16);
System.out.println(sample);
}
return super.postDecode(object);
}

@Override
public IAudioSamples postResample(IAudioSamples object) {
// TODO Auto-generated method stub
return super.postResample(object);
}

@Override
public IAudioSamples preEncode(IAudioSamples object) {
// TODO Auto-generated method stub
return super.preEncode(object);
}

@Override
public IAudioSamples preResample(IAudioSamples object) {
// TODO Auto-generated method stub
return super.preResample(object);
}

}
AudioListener will be responsible for listening encoded and decoded streams. While Xuggle decodes the stream, it calls postDecode method with the parameter including the decoded sample. object.getNumSamples(); line gets the number of samples in the decoded part. Remember that postDecode method is called regularly for a single stream. The number of sample depends on configuration, so in your system it can be 256, 1024 or another number. Suppose that you are decoding a sample sound recorded 8kH. That means that every second we have 8000 samples. If the number of samples is 1024 postDecode method is called 8000/1024 ~= 8 times in a second. By using getSample method you can get raw data from decoded stream. Also you can get raw byte array from sample. Check Xuggler API documentation for further information.For this to work you should also modify AudioTranscoderDemo.java file and have the following partial code in it.
Before:
 Transcoder transcoder = new Transcoder(aStream,
     outputStream, outputStreamInfo);
After:
 AudioListener listener = new AudioListener();
 Transcoder transcoder = new Transcoder(aStream,
     outputStream, outputStreamInfo, null, listener, null);
With this code we create an instance of the class
AudioListener and add this instance to the parameters of constructor of the Transcoder class.Now Eclipse compiles your code automatically. You can restart Red5 server and check the results. Run Publisher demo again and connect to
audiotranscode as described earlier. If you run Red5 server from command line, you will be able to see sound data in the command line, one sample per line. You can do whatever you want with the raw sound data. You can apply filters on it, or you can process it for feature extraction.In this post we learned how to setup eclipse to work with Red5-Xuggle application and get the raw sound data. In the next post we will use pure-data to get the pich of the sound.
Keep coding...
Thursday, July 16, 2009
Code Syntax Highlighting on Blogger.com
I found a good syntax highlighter at the following address http://alexgorbatchev.com/and use it on my blog at blogger.com. However there is one big problem with this Javascript library. Since blogger removes new lines (\n) and inserts < br > instead the code looks bad, it only consists of one line and has html break tags in it. In order to fix this problem I also add jQuery hosted by Google and come up with the following code for Layout of my blog:
The only line for the fix for blogger.com is the following line:
This line uses jQuery in order to modify HTML content. Basically, it finds all <br> tags which are under <pre> tags in DOM hierarchy, adds a new line after these tags and removes them from HTML. Just one line of code doing everything for us. Power of jQuery.
For each language you want to highlight you need to add the corresponding <script> tag. For example to highlight php you need to add the following line:
You can check the following link to see the languages supported: http://alexgorbatchev.com/pub/sh/2.0.320/scripts/.
You need to put your code into a <pre> tag to highlight it. Also you need to add a class attribute like "brush:html" in order for the script know the language you are using. The final code looks like
and this is rendered as
Keep on posting.
<link href='http://alexgorbatchev.com/pub/sh/2.0.320/styles/shCore.css' rel='stylesheet' type='text/css'/>
<link href='http://alexgorbatchev.com/pub/sh/2.0.320/styles/shThemeDefault.css' rel='stylesheet' type='text/css'/>
<script language='javascript' src='http://alexgorbatchev.com/pub/sh/2.0.320/scripts/shCore.js'/>
<script language='javascript' src='http://alexgorbatchev.com/pub/sh/2.0.320/scripts/shBrushCSharp.js'/>
<script language='javascript' src='http://alexgorbatchev.com/pub/sh/2.0.320/scripts/shBrushXml.js'/>
<script language='javascript' src='http://alexgorbatchev.com/pub/sh/2.0.320/scripts/shBrushAS3.js'/>
<script language='javascript' src='http://alexgorbatchev.com/pub/sh/2.0.320/scripts/shBrushJava.js'/>
<script language='javascript'>
$(document).ready(function () {
$("pre br").after("\n").remove();
SyntaxHighlighter.config.clipboardSwf = 'http://alexgorbatchev.com/pub/sh/2.0.320/scripts/clipboard.swf';
SyntaxHighlighter.all();
});
</script>
The only line for the fix for blogger.com is the following line:
$("pre br").after("\n").remove();
This line uses jQuery in order to modify HTML content. Basically, it finds all <br> tags which are under <pre> tags in DOM hierarchy, adds a new line after these tags and removes them from HTML. Just one line of code doing everything for us. Power of jQuery.
For each language you want to highlight you need to add the corresponding <script> tag. For example to highlight php you need to add the following line:
<script language='javascript' src='http://alexgorbatchev.com/pub/sh/2.0.320/scripts/shBrushPhp.js'/>
You can check the following link to see the languages supported: http://alexgorbatchev.com/pub/sh/2.0.320/scripts/.
You need to put your code into a <pre> tag to highlight it. Also you need to add a class attribute like "brush:html" in order for the script know the language you are using. The final code looks like
<pre class="brush:jscript">
function doNothing()
{
  var a = 1;
  var b = 2;
  var nothing = a*b;
  // alert(nothing);
}
</pre>
and this is rendered as
You should remember that in order to insert < or > characters in HTML or XML, you need to replace them with < and > respectively.
function doNothing()
{
  var a = 1;
  var b = 2;
  var nothing = a*b;
  // alert(nothing);
}
Keep on posting.
Integrating Red5, Xuggler and Pure-Data - Part 1
In this post, I demonstrate how to use Red5, Xuggler and PD (Pure-Data) together for frequency analysis of the sound.
What we will try to do is
Red5 is an open source alternative to Flash Media Server (FMS). It is designed to serve and receive multimedia streams to the clients which support rtmp protocol. Xuggler is an open source C++ and java library for decoding, encoding and manipulating the video and audio data. Pure-data is an realtime graphical programming environment for audio, video and graphical processing.
The client application runs on a browser with Flash plugin installed. It access the microphone and sends the audio signal to Red5 using rtmp protocol. Flash uses encoded audio for the streams, therefore we need to decode the audio signal by using Xuggler library. Luckily, Xuggler is already integrated with Red5 and there is a sample red5 application for xuggler called audiotranscoder.
First you need to install Red5. As the time of writing, the latest version of Red5 is 0.8. You can download this version here for Microsoft Windows. For other OS please follow this link. Download the file and run the installer. It installs Red5 to default installation directory (probably C:\Program Files\Red5). It also adds a new windows service called Red5 which runs the server. You can start the service from Services (Control Panel/Administrator Tools/Services). Just right click on the Red5 service and click Start. Also you can manually start Red5 from command line. For this open a command line promt, go to the directory where Red5 is installed, run red5.bat file.
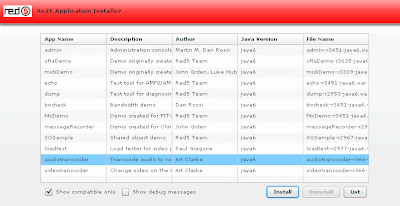
After you run Red5 server, from services or command line, open a browser window, and navigate to http://localhost:5080/. Red5 has also a built in web server by which you can install available applications. Click on the link "Click here to install demos." Red5 Application Installer will list all the available applications. You can select any application and click Install button to deploy that application to the Red5 server. Select audiotranscoder application and click Install.
 Now download Xuggler and install it. Also download Xuggle-Xuggler-Red5 library. For this click on the Ivy downloads link. Select the version and download xuggle-xuggler-red5-xxx.jar file. Copy this file to the lib directory in the Red5 installation directory (possibly c:\program files\Red5\lib). Delete existing xuggle-xuggler-xxx.jar file in lib directory. Copy xuggle-xuggler.jar file from Xuggle installation folder (c:\program files\Xuggle\share\java\jars) to lib directory in Red5 installation folder. At the end you should have the following files in Red5 lib directory:
Enter com.eb.red5.FrequencyAnalysis as the class of the .fla file you created.
 Download and install Pure-data extended.
In order to send the audio stream to pure-data we have to do some dirty things. First download netsend~ and netreceive~ routines for Pure-data from this web site. Go to download section and download netsend~ for pure-data for your operating system. Copy all .dll and .pd files to the extras folder in pure-data installation folder (probably C:\Program Files\pd\extra).
Open pure-data and create a new file as the following
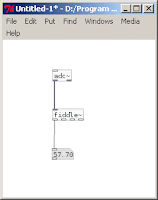
In order to write this program in PD, first launch PD. Create a new empty file by clicking File/New from menu. In order to add the boxes press Ctrl-1 (or from menu select Put/Object) and write down adc~. Press Ctrl-1 again and write fiddle~. Press Ctrl-3 (or from menu select Put/Number). Organize the boxes as displayed in the figure. Connect the boxes by dragging mouse from the relevant port of one box to the relevant port of the other box. Now we wrote our first PD program. Not that tough :)
Now lets understand what this program does. First adc~ means analog-to-digital converter. It gets the microphone input and converts it to an digital audio signal. fiddle~ receives this signal and performs a pitch analysis on it. The first port at the bottom of fiddle~ box is the pitch of the signal. Since this port is connected to a number box we can see the pitch of the sound realtime using this box.
In order to run our sample just check Compute Audio checkbox in the main PD window. Now experiment with your voice and check the corresponding pitch.
In the next post, I will modify the sample Red5 application audiotranscoder to get the raw audio data.
Keep in rolling...
What we will try to do is
- Get audio signal from flash client (handled by flash & red5)
- Decode audio file and get raw audio data (handled by xuggle)
- Send the raw audio stream to pure-data (no quick solution)
- Get the pitch of the sound (handled by pure-data)
- Send the pitch of the sound back to red5 (no quick solution)
- Send the pitch of the sound back to client (handled by red5 & flash
Red5 is an open source alternative to Flash Media Server (FMS). It is designed to serve and receive multimedia streams to the clients which support rtmp protocol. Xuggler is an open source C++ and java library for decoding, encoding and manipulating the video and audio data. Pure-data is an realtime graphical programming environment for audio, video and graphical processing.
The client application runs on a browser with Flash plugin installed. It access the microphone and sends the audio signal to Red5 using rtmp protocol. Flash uses encoded audio for the streams, therefore we need to decode the audio signal by using Xuggler library. Luckily, Xuggler is already integrated with Red5 and there is a sample red5 application for xuggler called audiotranscoder.
First you need to install Red5. As the time of writing, the latest version of Red5 is 0.8. You can download this version here for Microsoft Windows. For other OS please follow this link. Download the file and run the installer. It installs Red5 to default installation directory (probably C:\Program Files\Red5). It also adds a new windows service called Red5 which runs the server. You can start the service from Services (Control Panel/Administrator Tools/Services). Just right click on the Red5 service and click Start. Also you can manually start Red5 from command line. For this open a command line promt, go to the directory where Red5 is installed, run red5.bat file.
After you run Red5 server, from services or command line, open a browser window, and navigate to http://localhost:5080/. Red5 has also a built in web server by which you can install available applications. Click on the link "Click here to install demos." Red5 Application Installer will list all the available applications. You can select any application and click Install button to deploy that application to the Red5 server. Select audiotranscoder application and click Install.
 Now download Xuggler and install it. Also download Xuggle-Xuggler-Red5 library. For this click on the Ivy downloads link. Select the version and download xuggle-xuggler-red5-xxx.jar file. Copy this file to the lib directory in the Red5 installation directory (possibly c:\program files\Red5\lib). Delete existing xuggle-xuggler-xxx.jar file in lib directory. Copy xuggle-xuggler.jar file from Xuggle installation folder (c:\program files\Xuggle\share\java\jars) to lib directory in Red5 installation folder. At the end you should have the following files in Red5 lib directory:
- xuggle-xuggler.jar
- xuggle-xuggler-red5-X.X.XXX.jar
- Add new environment variable RED5_HOME=C:\program files\Red5
- Add new environment variable XUGGLE_HOME=C:\program files\Xuggle
- Add Xuggle bin directory (C:\Program files\Xuggle\bin) to the PATH variable.
package com.eb.red5 {
import flash.media.Microphone;
import flash.events.NetStatusEvent;
import flash.display.Sprite;
import flash.net.NetConnection;
import flash.net.NetStream;
import flash.net.ObjectEncoding;
import flash.net.SharedObject;

public class FrequencyAnalysis extends Sprite {

private var netConnection:NetConnection;
private var nsPublish:NetStream;
private var microphone:Microphone;
private var so:SharedObject;

public function FrequencyAnalysis() {
   trace("Initialization");
   attachMicrophone();
   netConnection=new NetConnection();
   netConnection.addEventListener(NetStatusEvent.NET_STATUS,checkForConnection);
   netConnection.objectEncoding=ObjectEncoding.AMF0;
   netConnection.connect("rtmp://localhost/audiotranscoder",true);
}

public function receiveMessage(mesg:String) {
   trace("Frequency is " + mesg);
}

private function checkForConnection(event:NetStatusEvent):void {
   trace("Connection Status:"+event.info.code);
   if (event.info.code == "NetConnection.Connect.Success") {
       nsPublish=new NetStream(netConnection);
       nsPublish.bufferTime=0;
       nsPublish.attachAudio(microphone);
       nsPublish.publish("user1","live");

       so=SharedObject.getRemote("user1",netConnection.uri,false);
       so.client=this;
       so.connect(netConnection);
   }
}

private function attachMicrophone() {
   microphone=Microphone.getMicrophone();
   microphone.gain=80;
   microphone.rate=22;
   microphone.setSilenceLevel(15,2000);
}
}
}
Enter com.eb.red5.FrequencyAnalysis as the class of the .fla file you created.
 Download and install Pure-data extended.
In order to send the audio stream to pure-data we have to do some dirty things. First download netsend~ and netreceive~ routines for Pure-data from this web site. Go to download section and download netsend~ for pure-data for your operating system. Copy all .dll and .pd files to the extras folder in pure-data installation folder (probably C:\Program Files\pd\extra).
Open pure-data and create a new file as the following

In order to write this program in PD, first launch PD. Create a new empty file by clicking File/New from menu. In order to add the boxes press Ctrl-1 (or from menu select Put/Object) and write down adc~. Press Ctrl-1 again and write fiddle~. Press Ctrl-3 (or from menu select Put/Number). Organize the boxes as displayed in the figure. Connect the boxes by dragging mouse from the relevant port of one box to the relevant port of the other box. Now we wrote our first PD program. Not that tough :)
Now lets understand what this program does. First adc~ means analog-to-digital converter. It gets the microphone input and converts it to an digital audio signal. fiddle~ receives this signal and performs a pitch analysis on it. The first port at the bottom of fiddle~ box is the pitch of the signal. Since this port is connected to a number box we can see the pitch of the sound realtime using this box.
In order to run our sample just check Compute Audio checkbox in the main PD window. Now experiment with your voice and check the corresponding pitch.
In the next post, I will modify the sample Red5 application audiotranscoder to get the raw audio data.
Keep in rolling...
Subscribe to:
Posts (Atom)