What we will try to do is
- Get audio signal from flash client (handled by flash & red5)
- Decode audio file and get raw audio data (handled by xuggle)
- Send the raw audio stream to pure-data (no quick solution)
- Get the pitch of the sound (handled by pure-data)
- Send the pitch of the sound back to red5 (no quick solution)
- Send the pitch of the sound back to client (handled by red5 & flash
Red5 is an open source alternative to Flash Media Server (FMS). It is designed to serve and receive multimedia streams to the clients which support rtmp protocol. Xuggler is an open source C++ and java library for decoding, encoding and manipulating the video and audio data. Pure-data is an realtime graphical programming environment for audio, video and graphical processing.
The client application runs on a browser with Flash plugin installed. It access the microphone and sends the audio signal to Red5 using rtmp protocol. Flash uses encoded audio for the streams, therefore we need to decode the audio signal by using Xuggler library. Luckily, Xuggler is already integrated with Red5 and there is a sample red5 application for xuggler called audiotranscoder.
First you need to install Red5. As the time of writing, the latest version of Red5 is 0.8. You can download this version here for Microsoft Windows. For other OS please follow this link. Download the file and run the installer. It installs Red5 to default installation directory (probably C:\Program Files\Red5). It also adds a new windows service called Red5 which runs the server. You can start the service from Services (Control Panel/Administrator Tools/Services). Just right click on the Red5 service and click Start. Also you can manually start Red5 from command line. For this open a command line promt, go to the directory where Red5 is installed, run red5.bat file.
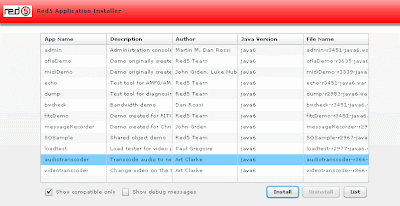
After you run Red5 server, from services or command line, open a browser window, and navigate to http://localhost:5080/. Red5 has also a built in web server by which you can install available applications. Click on the link "Click here to install demos." Red5 Application Installer will list all the available applications. You can select any application and click Install button to deploy that application to the Red5 server. Select audiotranscoder application and click Install.
 Now download Xuggler and install it. Also download Xuggle-Xuggler-Red5 library. For this click on the Ivy downloads link. Select the version and download xuggle-xuggler-red5-xxx.jar file. Copy this file to the lib directory in the Red5 installation directory (possibly c:\program files\Red5\lib). Delete existing xuggle-xuggler-xxx.jar file in lib directory. Copy xuggle-xuggler.jar file from Xuggle installation folder (c:\program files\Xuggle\share\java\jars) to lib directory in Red5 installation folder. At the end you should have the following files in Red5 lib directory:
- xuggle-xuggler.jar
- xuggle-xuggler-red5-X.X.XXX.jar
- Add new environment variable RED5_HOME=C:\program files\Red5
- Add new environment variable XUGGLE_HOME=C:\program files\Xuggle
- Add Xuggle bin directory (C:\Program files\Xuggle\bin) to the PATH variable.
package com.eb.red5 {
import flash.media.Microphone;
import flash.events.NetStatusEvent;
import flash.display.Sprite;
import flash.net.NetConnection;
import flash.net.NetStream;
import flash.net.ObjectEncoding;
import flash.net.SharedObject;

public class FrequencyAnalysis extends Sprite {

private var netConnection:NetConnection;
private var nsPublish:NetStream;
private var microphone:Microphone;
private var so:SharedObject;

public function FrequencyAnalysis() {
   trace("Initialization");
   attachMicrophone();
   netConnection=new NetConnection();
   netConnection.addEventListener(NetStatusEvent.NET_STATUS,checkForConnection);
   netConnection.objectEncoding=ObjectEncoding.AMF0;
   netConnection.connect("rtmp://localhost/audiotranscoder",true);
}

public function receiveMessage(mesg:String) {
   trace("Frequency is " + mesg);
}

private function checkForConnection(event:NetStatusEvent):void {
   trace("Connection Status:"+event.info.code);
   if (event.info.code == "NetConnection.Connect.Success") {
       nsPublish=new NetStream(netConnection);
       nsPublish.bufferTime=0;
       nsPublish.attachAudio(microphone);
       nsPublish.publish("user1","live");

       so=SharedObject.getRemote("user1",netConnection.uri,false);
       so.client=this;
       so.connect(netConnection);
   }
}

private function attachMicrophone() {
   microphone=Microphone.getMicrophone();
   microphone.gain=80;
   microphone.rate=22;
   microphone.setSilenceLevel(15,2000);
}
}
}
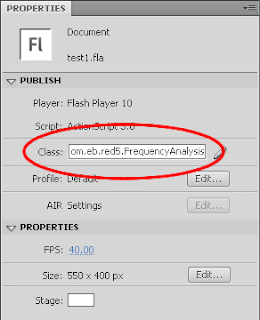
Enter com.eb.red5.FrequencyAnalysis as the class of the .fla file you created.
 Download and install Pure-data extended.
In order to send the audio stream to pure-data we have to do some dirty things. First download netsend~ and netreceive~ routines for Pure-data from this web site. Go to download section and download netsend~ for pure-data for your operating system. Copy all .dll and .pd files to the extras folder in pure-data installation folder (probably C:\Program Files\pd\extra).
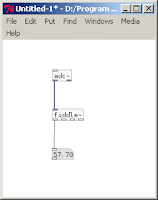
Open pure-data and create a new file as the following

In order to write this program in PD, first launch PD. Create a new empty file by clicking File/New from menu. In order to add the boxes press Ctrl-1 (or from menu select Put/Object) and write down adc~. Press Ctrl-1 again and write fiddle~. Press Ctrl-3 (or from menu select Put/Number). Organize the boxes as displayed in the figure. Connect the boxes by dragging mouse from the relevant port of one box to the relevant port of the other box. Now we wrote our first PD program. Not that tough :)
Now lets understand what this program does. First adc~ means analog-to-digital converter. It gets the microphone input and converts it to an digital audio signal. fiddle~ receives this signal and performs a pitch analysis on it. The first port at the bottom of fiddle~ box is the pitch of the signal. Since this port is connected to a number box we can see the pitch of the sound realtime using this box.
In order to run our sample just check Compute Audio checkbox in the main PD window. Now experiment with your voice and check the corresponding pitch.
In the next post, I will modify the sample Red5 application audiotranscoder to get the raw audio data.
Keep in rolling...
No comments:
Post a Comment