What we will try to do is
- Get audio signal from flash client (handled by flash & red5)
- Decode audio file and get raw audio data (handled by xuggle)
- Send the raw audio stream to pure-data (no quick solution)
- Get the pitch of the sound (handled by pure-data)
- Send the pitch of the sound back to red5 (no quick solution)
- Send the pitch of the sound back to client (handled by red5 & flash
In order to develop application in Red5 you need to have an IDE (Integrated Development Environment). Even though you can use command line java compiler (javac) and your favorite text editor (notepad :)), I recommend you to use an IDE.
Eclipse is an open source java based IDE. You can download Eclipse from http://www.eclipse.org/downloads. Download and install Eclipse IDE for Java Developers.
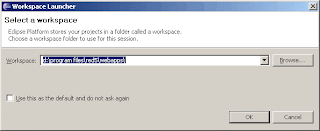
When you run Eclipse for the first time, it will ask you the workspace directory. Workspace is a directory in which all your projects resides (for example java). You can enter <RED5_HOME>\webapps\ as the workspace if you will use Eclipse only for this project. Replace <RED5_HOME> with the directory where you install Red5 (ex. c:\Program Files\Red5).
In the previous post, we install audiotranscoder application. Now we will get the code for this application, change and compile it again.
To continue please first install audiotranscoder demo application as described here.
Now you have
audiotranscoder folder under webapps directory in Red5 installation folder. In order to change audiotranscoder application we need to get source code of this demo application first. You can get the source code of audiotranscoder application from svn archieve. Since The source code is just two files you can download them directly from the following web page:http://code.google.com/p/xuggle/source/browse/#svn/trunk/java/xuggle-xuggler-red5/src/com/xuggle/red5/demo
Download AudioTranscoderDemo.java and AudioTranscoderDemoAdapter.java.
Create a new directory called src under webapps\audiotranscoder. Also create com\eb\red5 directories under src directory. Copy the two java files under this directory. At the end you should have the following files:
- c:\Program Files\Red5\webapps\audiotranscoder\src\com\eb\red5\AudioTranscoderDemo.java
- c:\Program Files\Red5\webapps\audiotranscoder\src\com\eb\red5\AudioTranscoderDemoAdapter.java
First update the package declaration in both files from
package com.xuggle.red5.demo;
to
package com.eb.red5;
Open WEB-INF\red5-web.xml file, find web.handler and change it as the following
<bean id="web.handler"
class="com.eb.red5.AudioTranscoderDemoAdapter"
init-method="init">
<!-- Have the profiler spit out data every 15 seconds -->
<property name="profilerFrequency" value="15"/>
</bean>
This will tell red5 the name of the class which is responsible to handle the rtmp requests.
Create a folder called
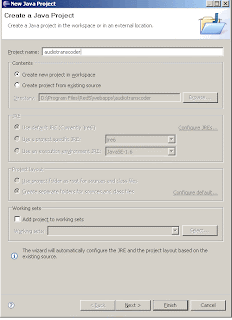
lib under WEB-INF directory. Copy <XUGGLE_HOME>\share\java\jars\slf4j-api.jar and <XUGGLE_HOME>\share\java\jars\commons-cli.jar files to lib folder. Also you can select copy these files under <RED5_HOME>\lib folder instead of <READ5_HOME>\webapps\audiotranscoder\WEB-INF\lib folder. Download and copy jetm.jar file under lib folder.Now open eclipse. Select the workspace (c:\program files\red5\webapps). Click File/New/Java Project from main menu. Enter project name as "audiotranscoder". Click Next.
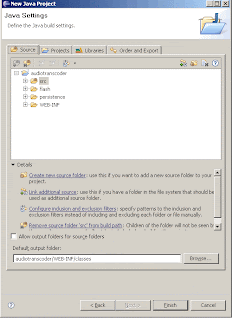
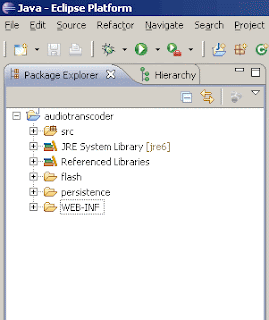
 In the next screen, right click on src folder and click on "Use as Source Folder". As default output folder enter audiotranscoder/WEB-INF/classes. If there is no classes folder create it manually.
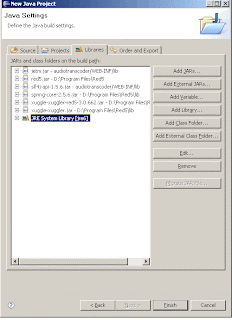
 Click on Libraries tab. Click on "Add Library". This will open another form. In this form select "JRE System Library", click next and finish. Click on "Add External JARs..." Select xuggle-xuggler.jar, xuggle-xuggler-red5-3.0.662.jar and spring-core-2.5.6.jar from C:\Program Files\Red5\lib folder. Click "Add External JARs..." again and now select red5.jar from C:\Program Files\Red5 folder. Click on "Add JARs..." and select audiotranscoder\WEB-INF\lib\jetm.jar and slf4j-api-1.5.6.jar. It looks like the following
Click finish to create the project on Eclipse.
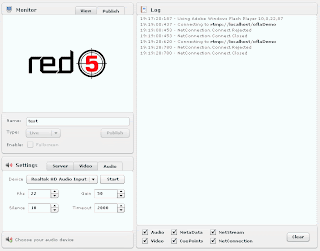
Now run Red5 from command line (c:\program files\red5\red5.bat). Open your browser and navigate to the address http://localhost:5080/demos/publisher.html.
Select Publish tab, enter stream name as "test", select audio device and click Start.
 Select View tab. Enter "xuugle_test" as stream name, rtmp://localhost/audiotranscoder as server location and set Buffer to zero. Click on Connect.
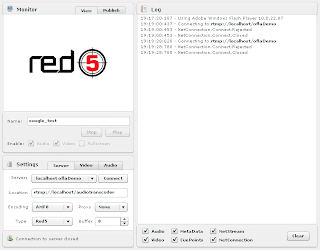 Now you are publishing a stream named "test", it is decoded and encoded again (using PCM which is the raw format) and published with the stream name "xuggle_test".
What we will do now is to get the sound data from PCM stream.
PCM stands for Pulse-Code Modulation. See Wikipedia article for more information.
Now click on File/New/Class from Eclipse main menu. Enter com.eb.red5 as package, AudioListener as the name of the class and com.xuggle.red5.AudioSamplesListener as superclass. Leave other options as is and click Finish.

Paste the following code into AudioListener.java file.
package com.eb.red5;

import com.xuggle.red5.AudioSamplesListener;
import com.xuggle.xuggler.IAudioSamples;
import com.xuggle.xuggler.IAudioSamples.Format;

public class AudioListener extends AudioSamplesListener {

@Override
public IAudioSamples postDecode(IAudioSamples object) {
// TODO Auto-generated method stub
long N = object.getNumSamples();
for (long i=0;i<N;i++)
{
long sample = object.getSample(i, 0, Format.FMT_S16);
System.out.println(sample);
}
return super.postDecode(object);
}

@Override
public IAudioSamples postResample(IAudioSamples object) {
// TODO Auto-generated method stub
return super.postResample(object);
}

@Override
public IAudioSamples preEncode(IAudioSamples object) {
// TODO Auto-generated method stub
return super.preEncode(object);
}

@Override
public IAudioSamples preResample(IAudioSamples object) {
// TODO Auto-generated method stub
return super.preResample(object);
}

}
AudioListener will be responsible for listening encoded and decoded streams. While Xuggle decodes the stream, it calls postDecode method with the parameter including the decoded sample. object.getNumSamples(); line gets the number of samples in the decoded part. Remember that postDecode method is called regularly for a single stream. The number of sample depends on configuration, so in your system it can be 256, 1024 or another number. Suppose that you are decoding a sample sound recorded 8kH. That means that every second we have 8000 samples. If the number of samples is 1024 postDecode method is called 8000/1024 ~= 8 times in a second. By using getSample method you can get raw data from decoded stream. Also you can get raw byte array from sample. Check Xuggler API documentation for further information.For this to work you should also modify AudioTranscoderDemo.java file and have the following partial code in it.
Before:
 Transcoder transcoder = new Transcoder(aStream,
     outputStream, outputStreamInfo);
After:
 AudioListener listener = new AudioListener();
 Transcoder transcoder = new Transcoder(aStream,
     outputStream, outputStreamInfo, null, listener, null);
With this code we create an instance of the class
AudioListener and add this instance to the parameters of constructor of the Transcoder class.Now Eclipse compiles your code automatically. You can restart Red5 server and check the results. Run Publisher demo again and connect to
audiotranscode as described earlier. If you run Red5 server from command line, you will be able to see sound data in the command line, one sample per line. You can do whatever you want with the raw sound data. You can apply filters on it, or you can process it for feature extraction.In this post we learned how to setup eclipse to work with Red5-Xuggle application and get the raw sound data. In the next post we will use pure-data to get the pich of the sound.
Keep coding...
8 comments:
Loved this guide! My organization is attempting red5/smartfox video chatrooms, and this got me started on how to hook in ffmpeg for inline transcoding.
Thanks!
-Alex
Hi,
I'm very interested by this tutorial.
I am in a Franch company wich work on live interactive video.
Do you stop on the 3rd, maybe i can participate ?
Hi kim-line,
I did not continue because of the time constraints. I complete the integration however the performance of this configuration is very poor because the cost of launching PD is too much to use in a production environment. There in our project (http://www.thecolorofmyvoice.com) I ommit PD and write the frequency detection algorithm directly in java. Since the aim of the tutorial become absolute for me I decide not to complete it. However you are welcome to write the reset.
Hi Ersin,
I know that you found another solution (very neat (the color of my voice)), but i am trying to just finish at least part 2 of your tutorial ;)
Here's the error i have when starting red5:
http://pastebin.com/VfTUrEVi
in webapps/audiotranscoder/WEB-INF/classes/com/eb/red5 i have those files:
AudioTranscoderDemoAdapter$1.class
AudioTranscoderDemoAdapter.class
AudioTranscoderDemo.class
no error in Eclipse, can you pin point the mistake that i made?
thanks!!!!
Hi Psc,
Please check if the library xuggle-xuggler library is in the classpath. The files should be xuggle-xuggler.jar, and xuggle-xuggler-red5-X.X.XXX.jar. Double check the Part I of this tutorial. Hope that helps.
Caused by: java.lang.UnsatisfiedLinkError: no xuggle-xuggler in java.library.path
at com.xuggle.red5.demo.VideoTranscoderDemoAdapter.init(VideoTranscoderDemoAdapter.java:87)
Ersin, thank you for taking the time to help me! Meanwhile, i found another project a little bit like yours: http://www.speechapi.com/opensource/
not easy for me, i never coded in java and red5 / xuggler are not small projects. all i want is to be able to connect pure data to it. huge task...
cheers
It works! I have the samples in the console (i am using linux). Very nice!
Since there's no Step 3 to your tutorial, i have to ask you what was your concept / idea on "how to get those samples in pure data"?
any advice would be very appreciated!
Hi pcs,
You can use netsend~ and netreceive~ commands in PD. You can download their source codes from http://www.nullmedium.de/dev/netsend~/ These methods are used to send RAW audio signal between PD and Max/MSP instances. However you need to write a java client application which will send the audio data to pd instance in the format that PD expects. This may require a little reverse engineering. netreceive~ command listens a single port. Therefore you need create and open a new PD patch with different port numbers for each connection. This is a major issue, and PD performance is not suitable for multiple simultaneous operations. You souldn't use this configuration in production.
Post a Comment